|
|
VISIT OUR NEW AND IMPROVED SITE!!!I will leave this site up, but new patterns will only apear on the new site. Please check it out! This site will automaticly redirect in 30 seconds. Why wait? Click the link above and see the new site right away! |
|
|
Free Pumpkin Patterns!I created these patterns for use on our own pumpkins and thought you might enjoy them as well. Click on the pattern you want to get the full size pattern. None of these patterns are good patterns for small children to carve. My family has carved each of these patterns, so we know they work and look great. They each require the use of pumpkin carving tools such as the ones from http://www.pumpkinmasters.com Have a great, safe and fun Halloween! |
||
Scroll down the page to find
details about each of these patterns


 |
||
|
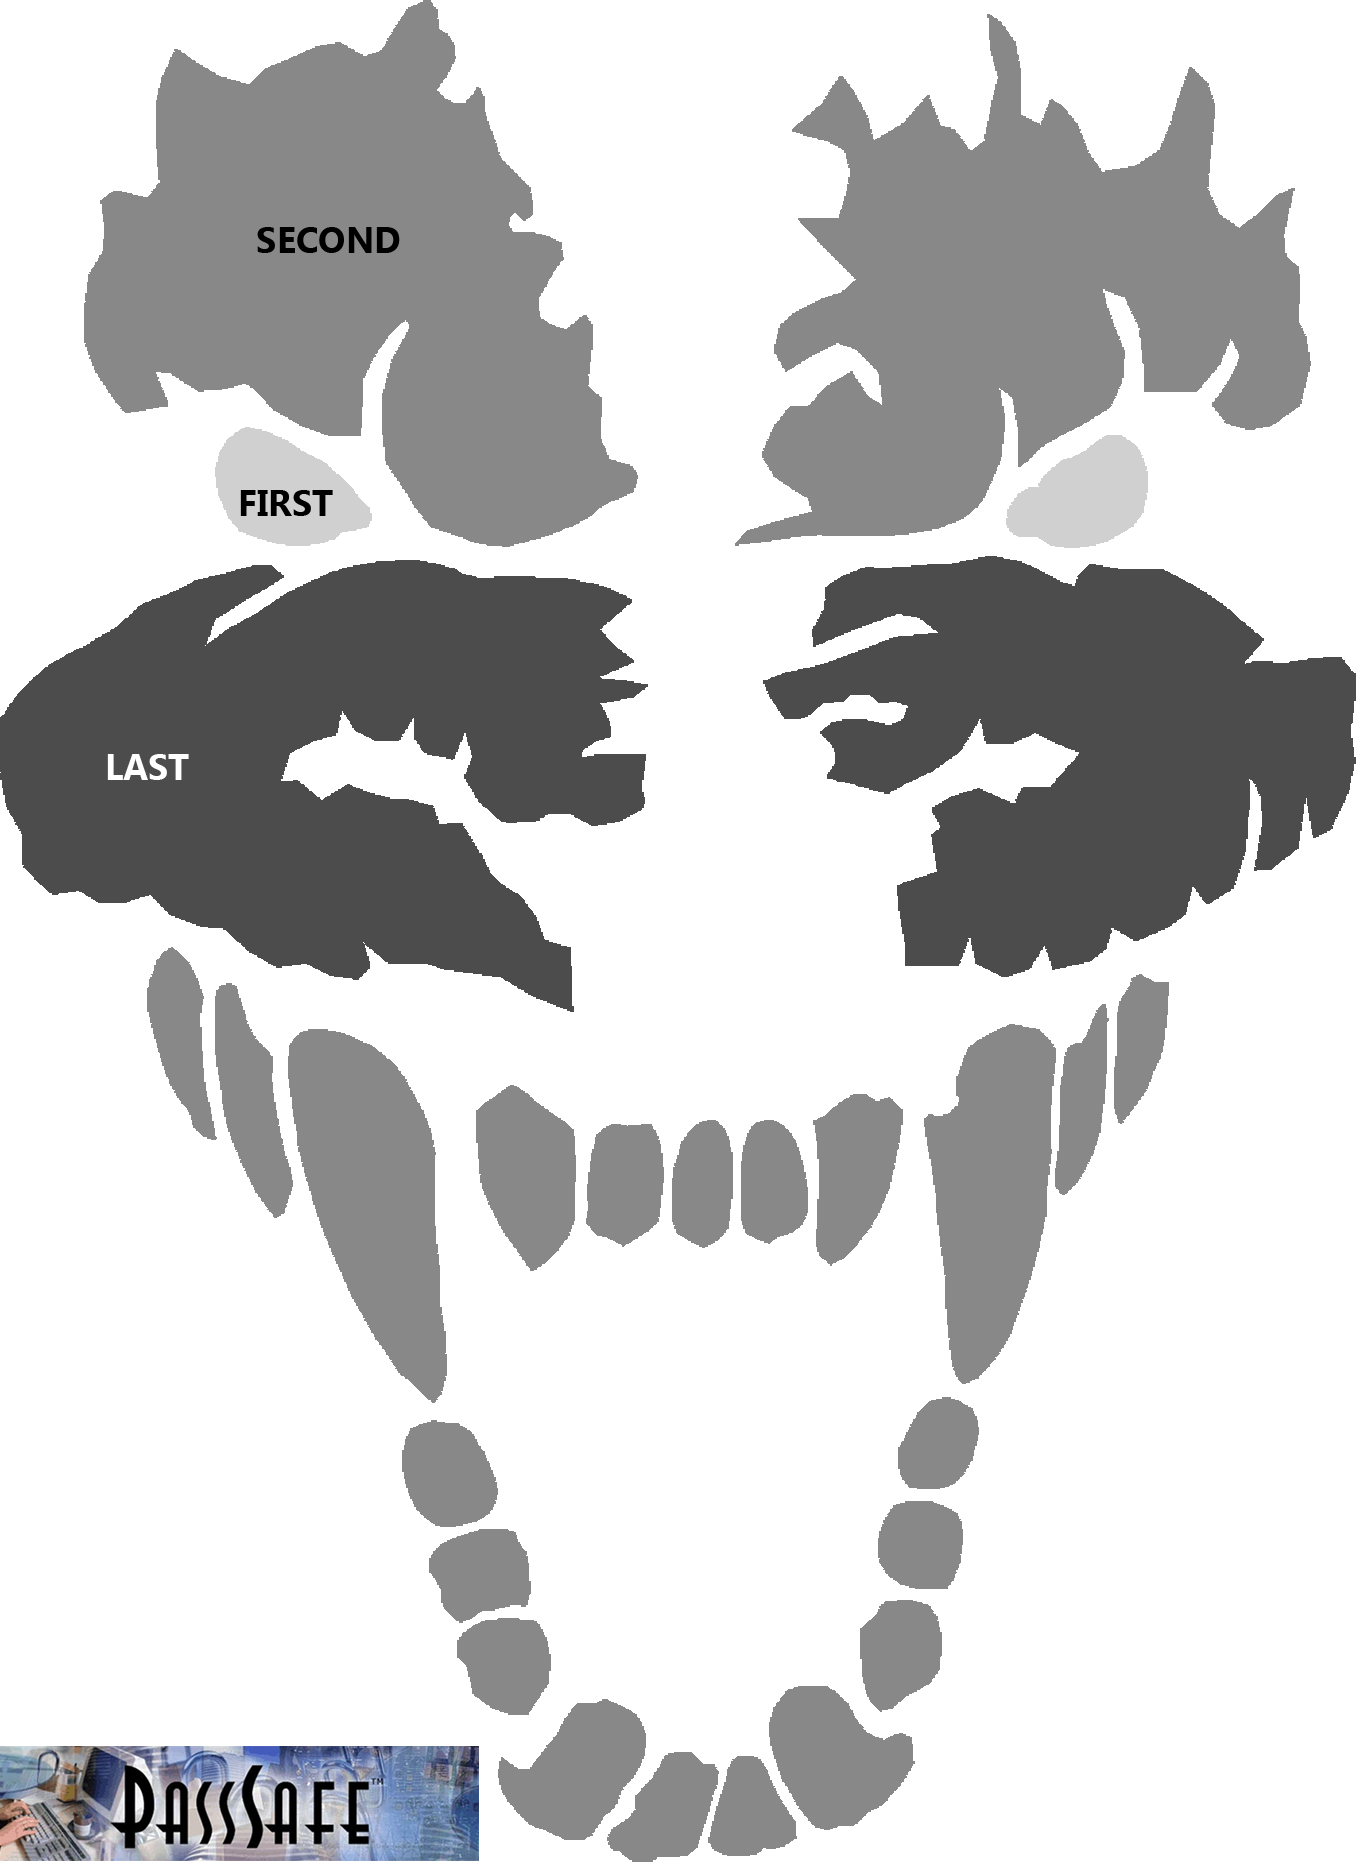
Cut out the yellow parts. Click on each picture to see the full patterns. |
||
|
2000
Charizard - This makes a great pumpkin! |
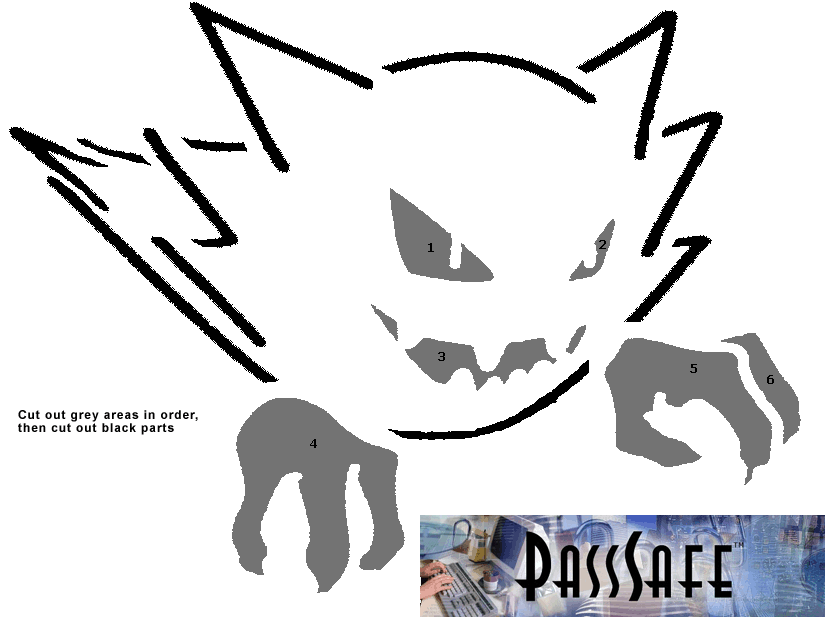
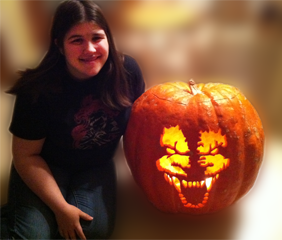
2000 Haunter - A Halloween favorite! |
|
2000
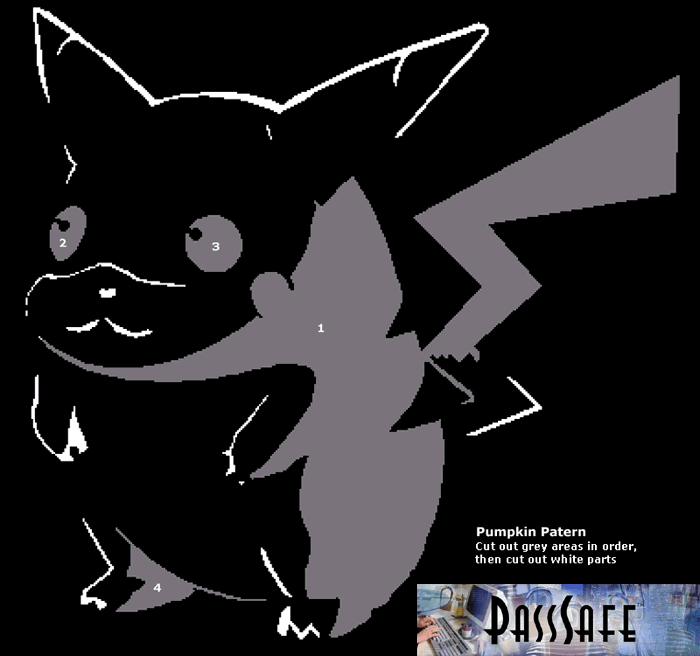
Pikachu is pretty easy, but a few parts take a steady hand. We find that this pattern will last several days that the all the kids recognize it easily and love it! |
Do
you have a pumpkin
pattern that we should put here? Send it to us at Take a picture of your final work and send it to us! We would love to see them.
Unless otherwise stated, all patterns are created by and the sole
property of
|
|
|
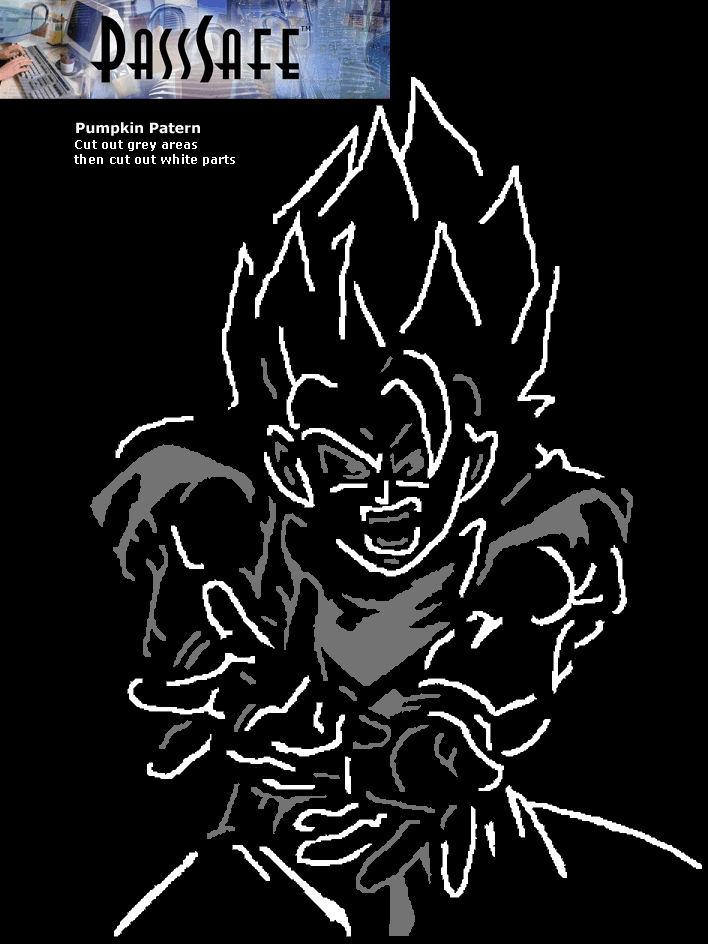
2001 We know that many kids are also Dragon Ball Z fans. Please carve this pattern using a large pumpkin on Halloween day as it contains many fine details and you don't want the pumpkin to wilt before you can show off your awesome work! Note: For an easier pattern, or for use on a smaller pumpkin, only carve the head and hair. I think if I carved this one again, I'd only do the head and hair. The level of detail made wilting a real problem. |
2001 This pattern is pretty complex, but not as hard is it may look. I've simplified it and removed some of the details I included in my carving so that it will be easier for you and hold up better. 2001 was my year to learn the challenges of too much detail. All the thin lines may make your hands very tired. It's hard to not have any large cutouts and all details that require working with the small saw. The response we got made all the effort worth it! This made a really great looking pumpkin. |
|
|
2002 In 2002, I was short on time so instead of making a pattern I searched the web for one that I thought I could do quickly and easily. Warning, the stars are tough and will really wear your hand out. Make sure you scrape the inside of the pumpkin to about 1/4" think behind the stars to make carving them much easier. I found this American flag pumpkin pattern at http://www.pcjackolantern.com/FREE/FlagPat.HTML and loved it. The site was down today when I checked, but it said come back next season, so hopefully it's up again by the time you are reading this. Check it out, I remember that it was a pretty good site. |
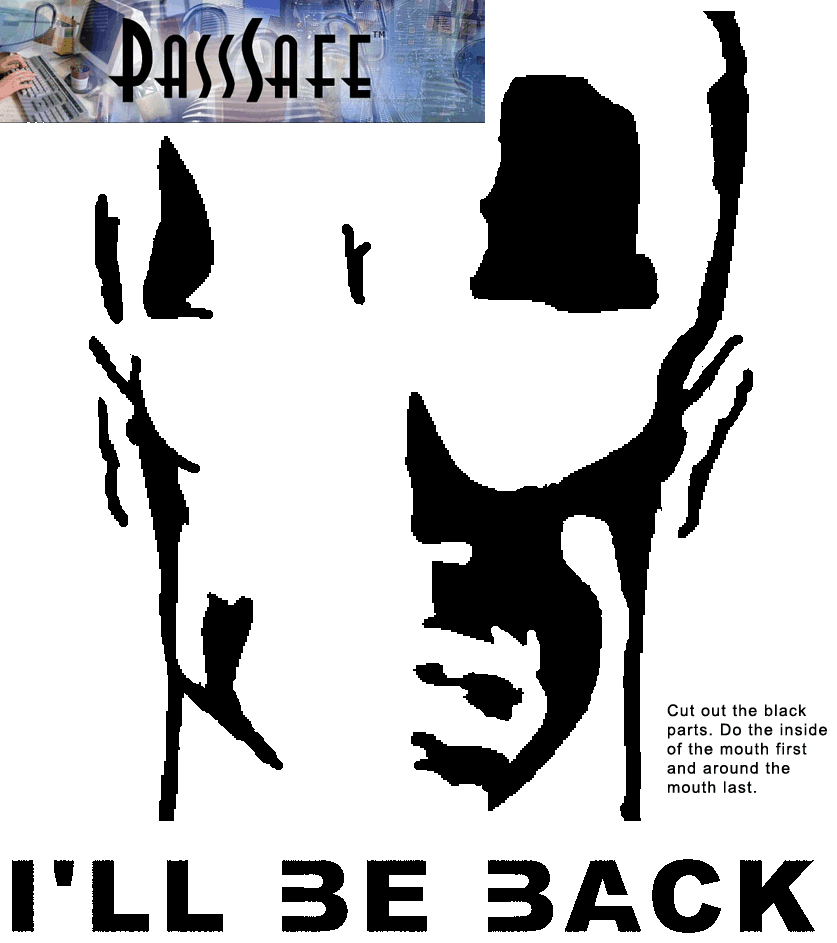
2003 Again in 2003 I was pressed for time, so I tried to create a pattern that I could create and carve quickly. With Arnold in the news, this one was a simple choice. I'm wondering how many of the kids will even know who the terminator is. I found out on Halloween! They loved it! I used a toothpick to strengthen the upper lip and keep it from wilting. I recommend that you carve this the night before and hope for cool weather. Be sure to carve the inside of the mouth first and the area around the mouth last. As always, get the biggest pumpkin you can find to help with strength and for the best effect. |
|
|
2004
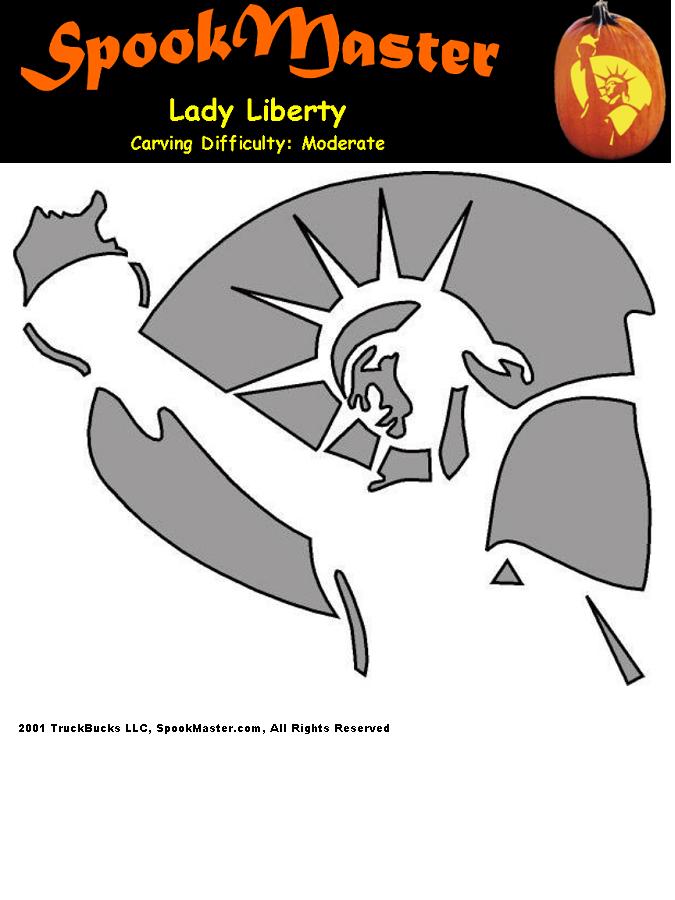
I ended up short on time yet again this year, so I went to http://www.spookmaster.com/pumpkin-carving-patterns/pumpkin-carving-patterns-ladyliberty.jpg and got this pattern and carved it in less than an hour just before the first trick-or-treaters arrived. My daughter and wife insisted that I do something more than the basic triangle eye face I was ready to do... they say I have a reputation to uphold. :-) Well, it went over well, and being just days before a presidential election, lady liberty seemed like a good pick. |
||
|
2005
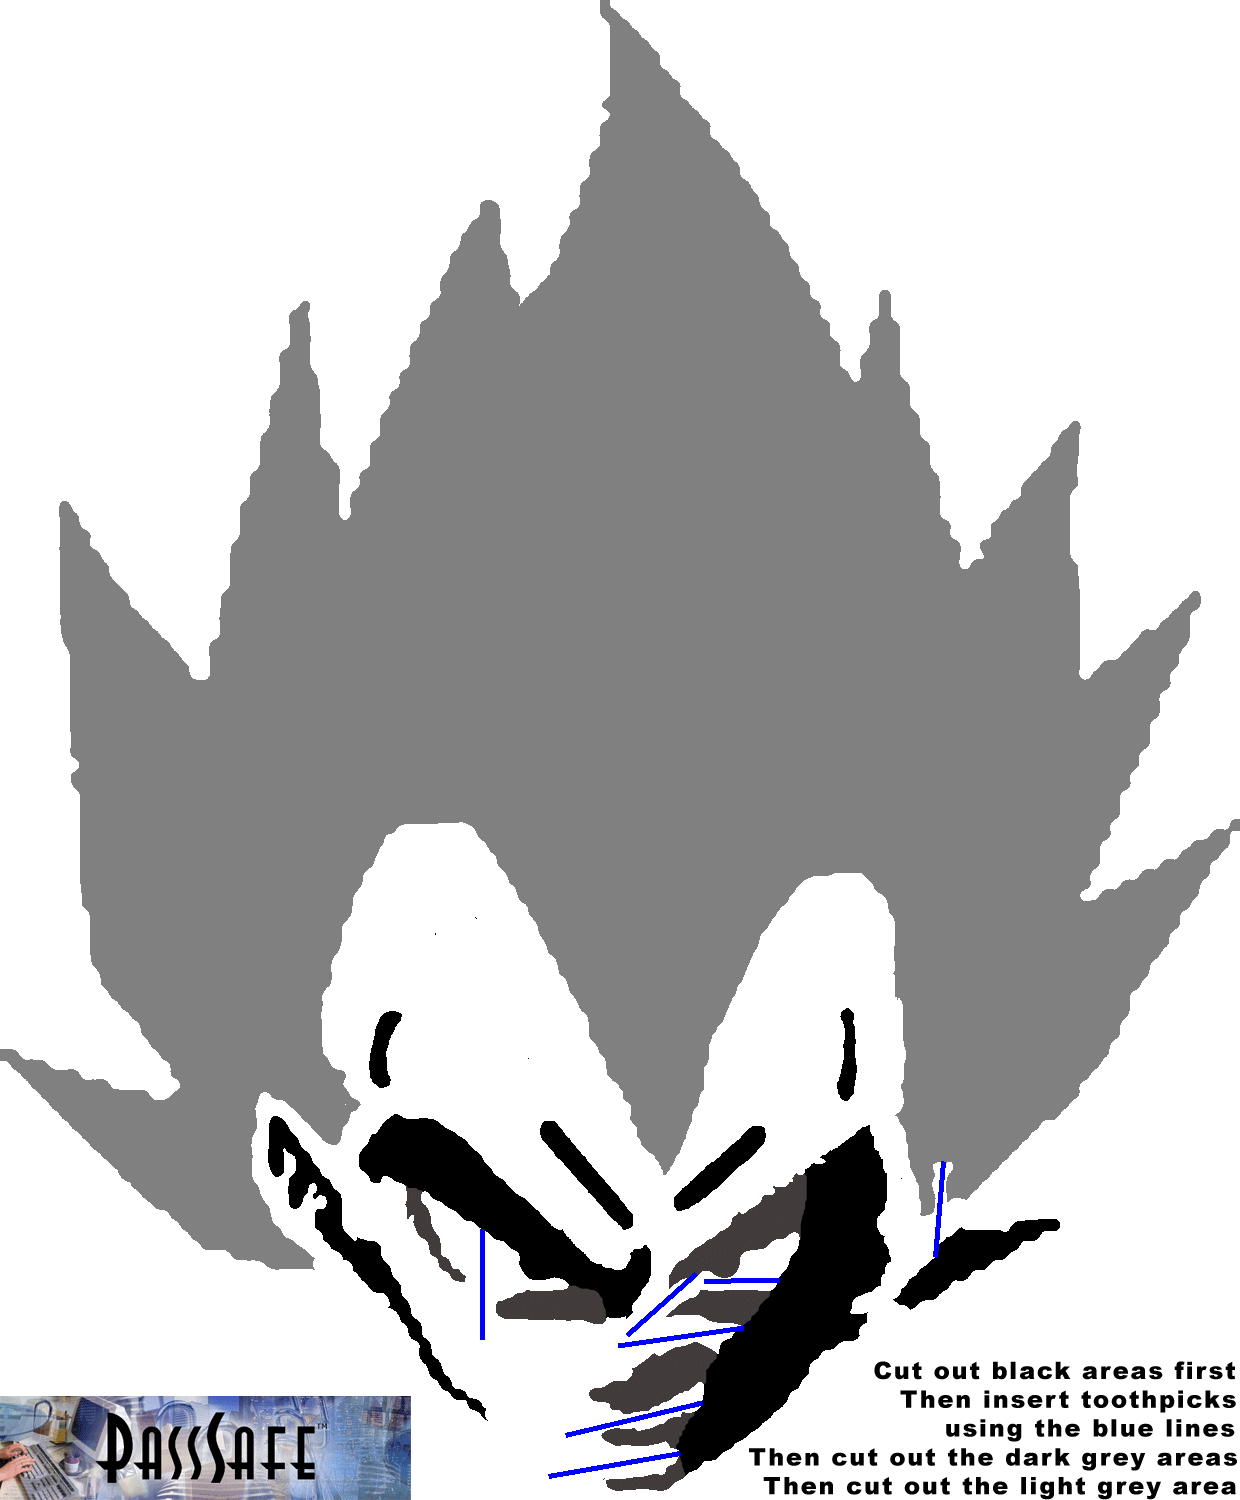
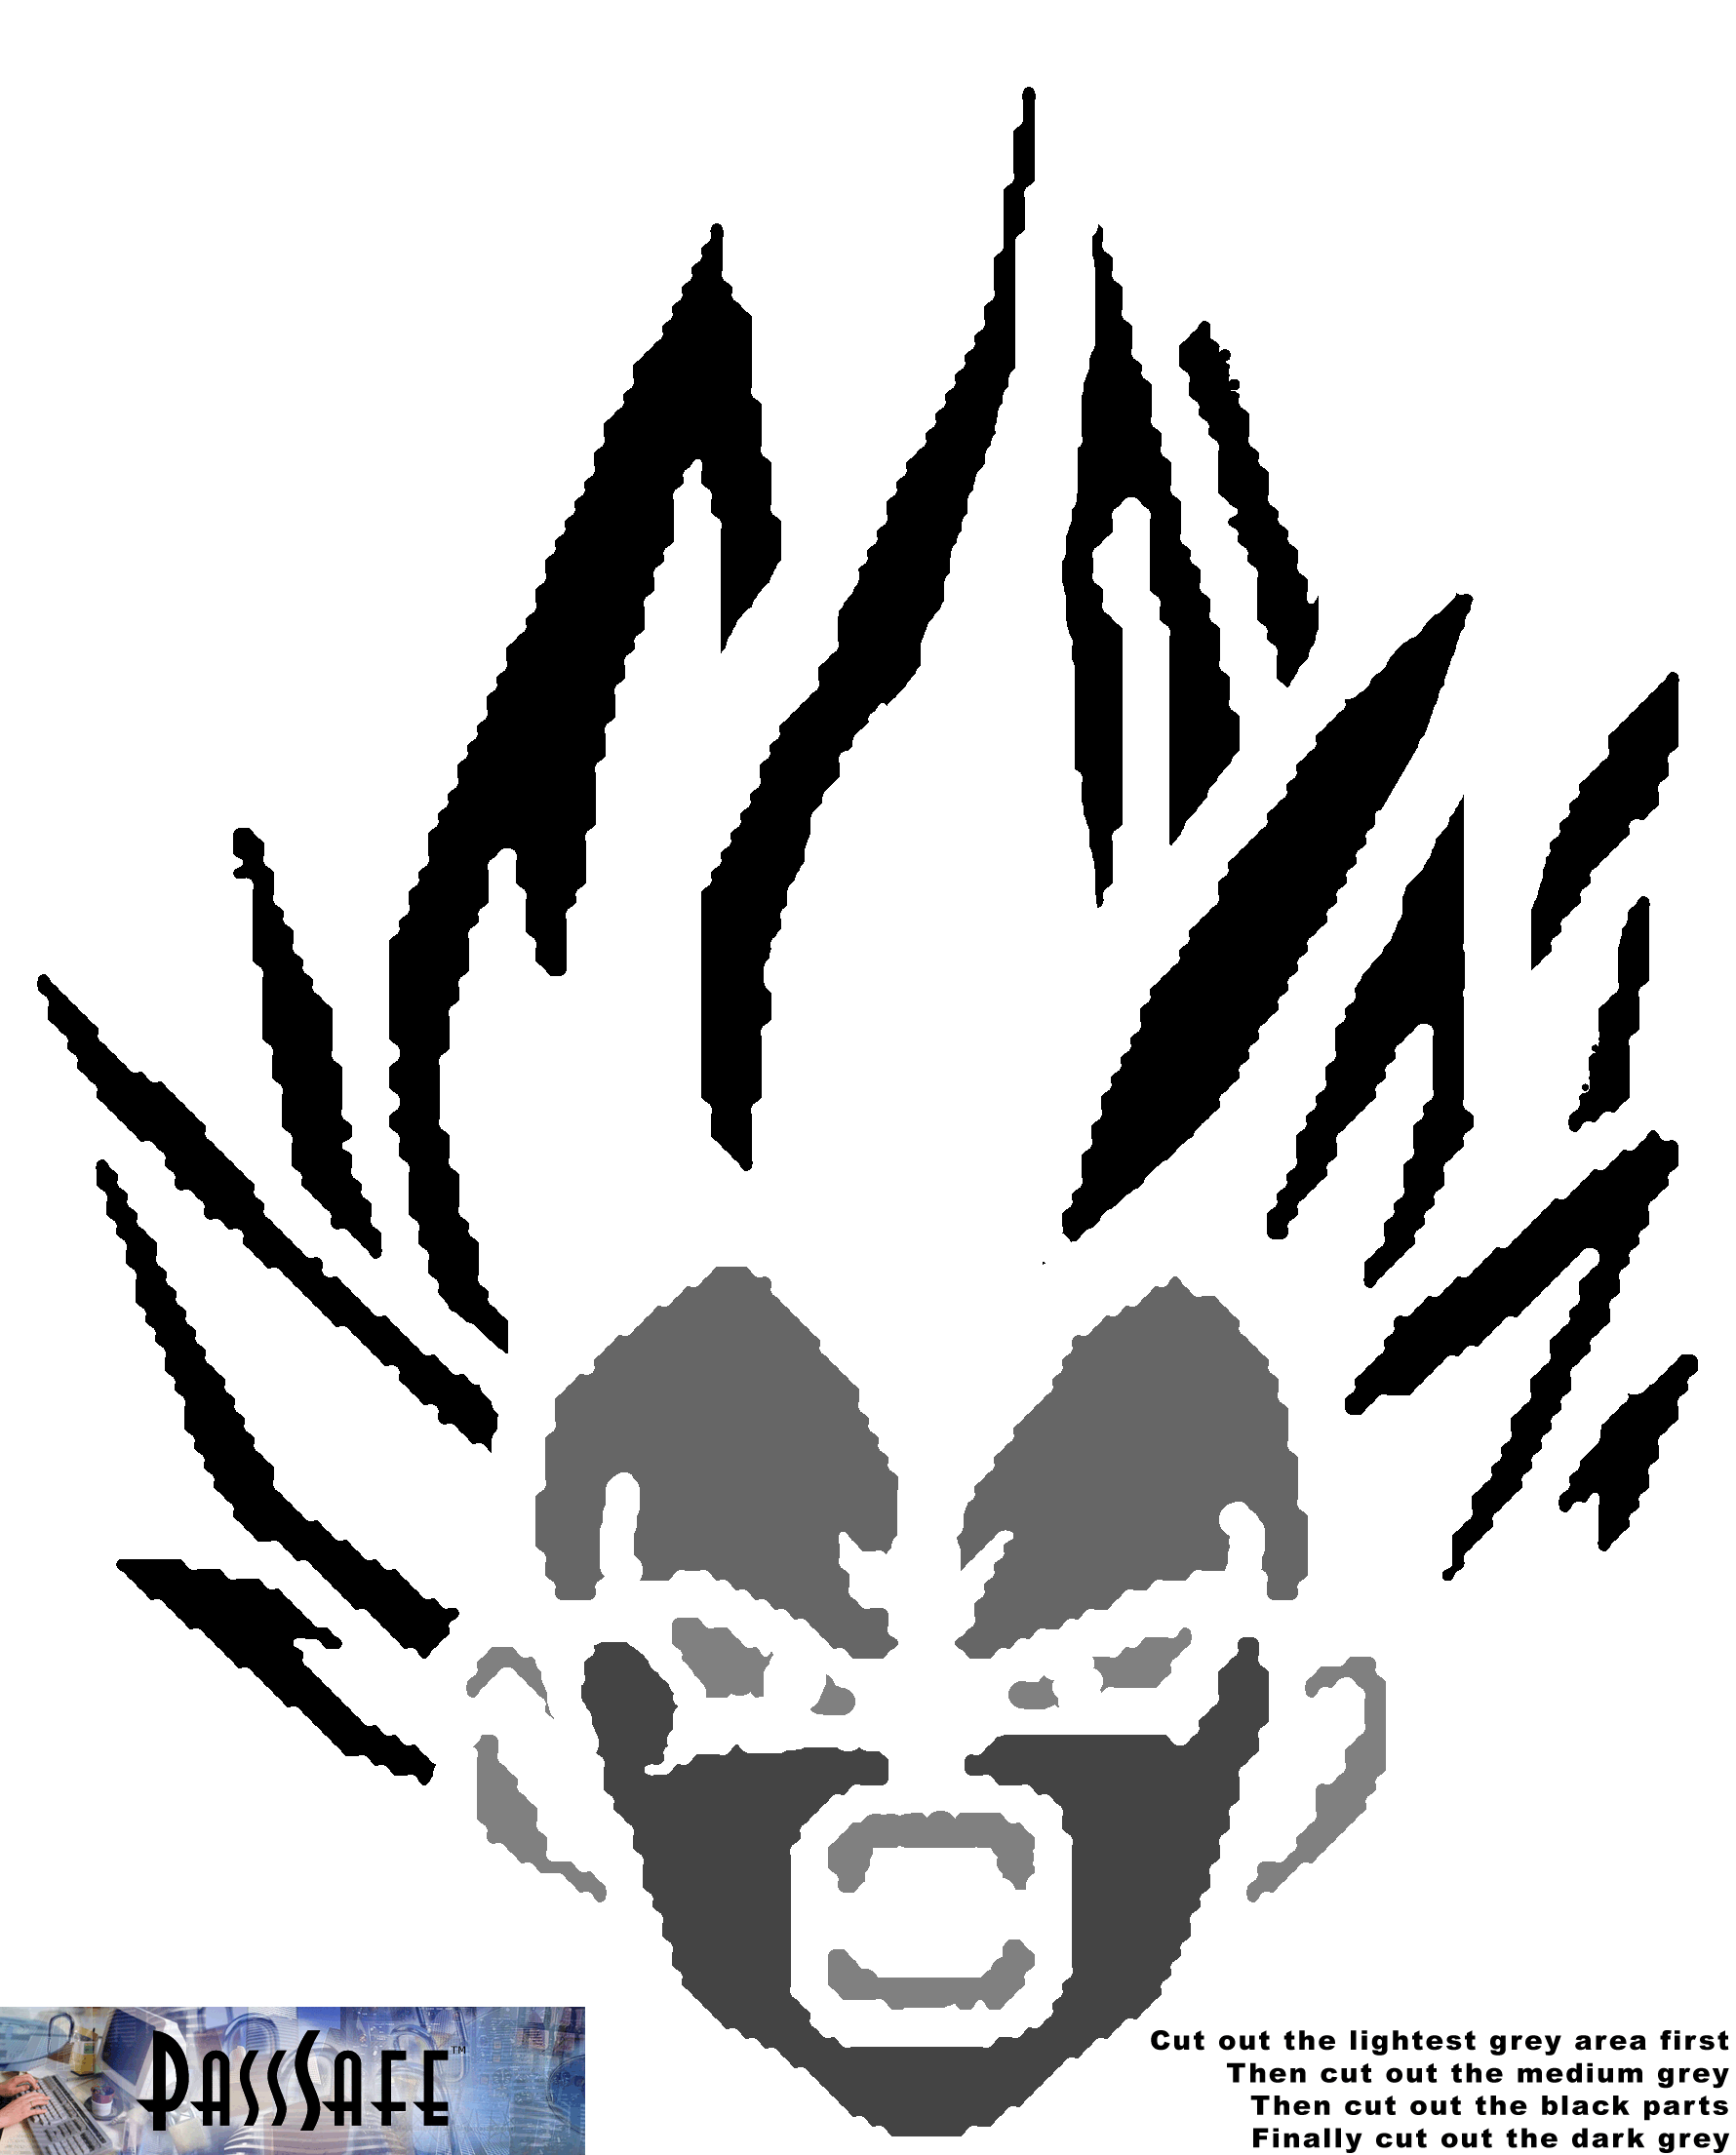
My daughter Katherine is still so into Dragonball and Vegeta is her very favorite character, you might even say that she is a bit obsessed with him. As a dad, I guess I'm just glad it isn't a real boy that my 13 year old is in love with. So for her, I created these patterns from frames from the show that she picked out. For all those Vegeta lovers out there, I hope you like my latest patterns. |
||
|
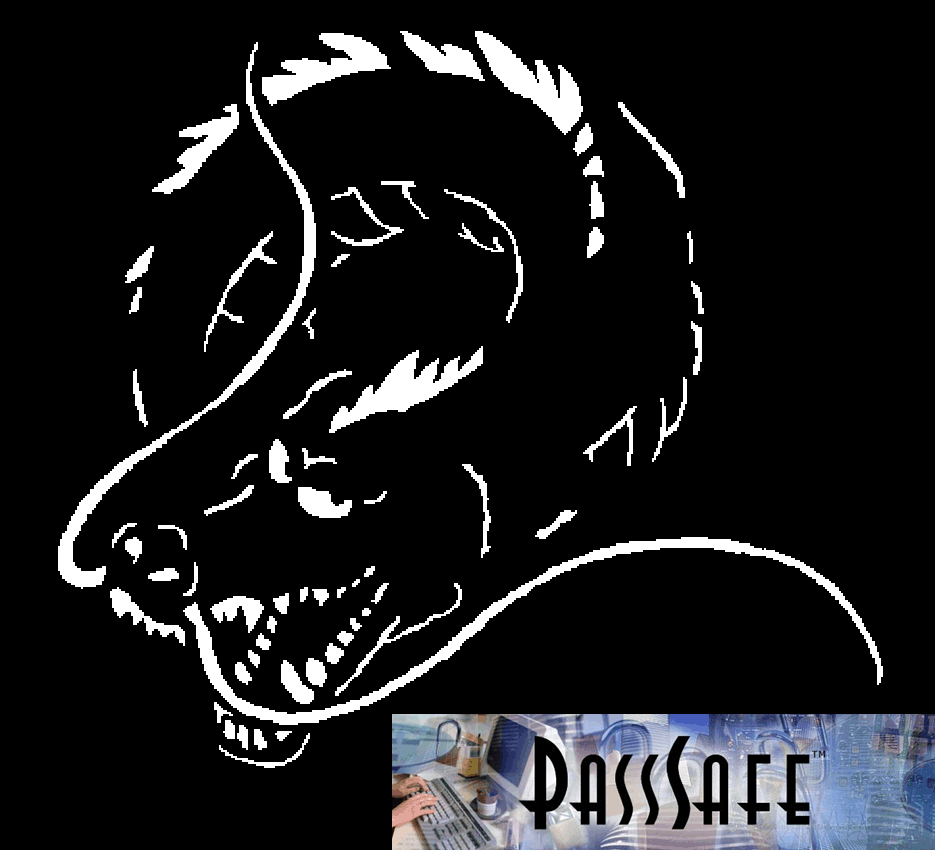
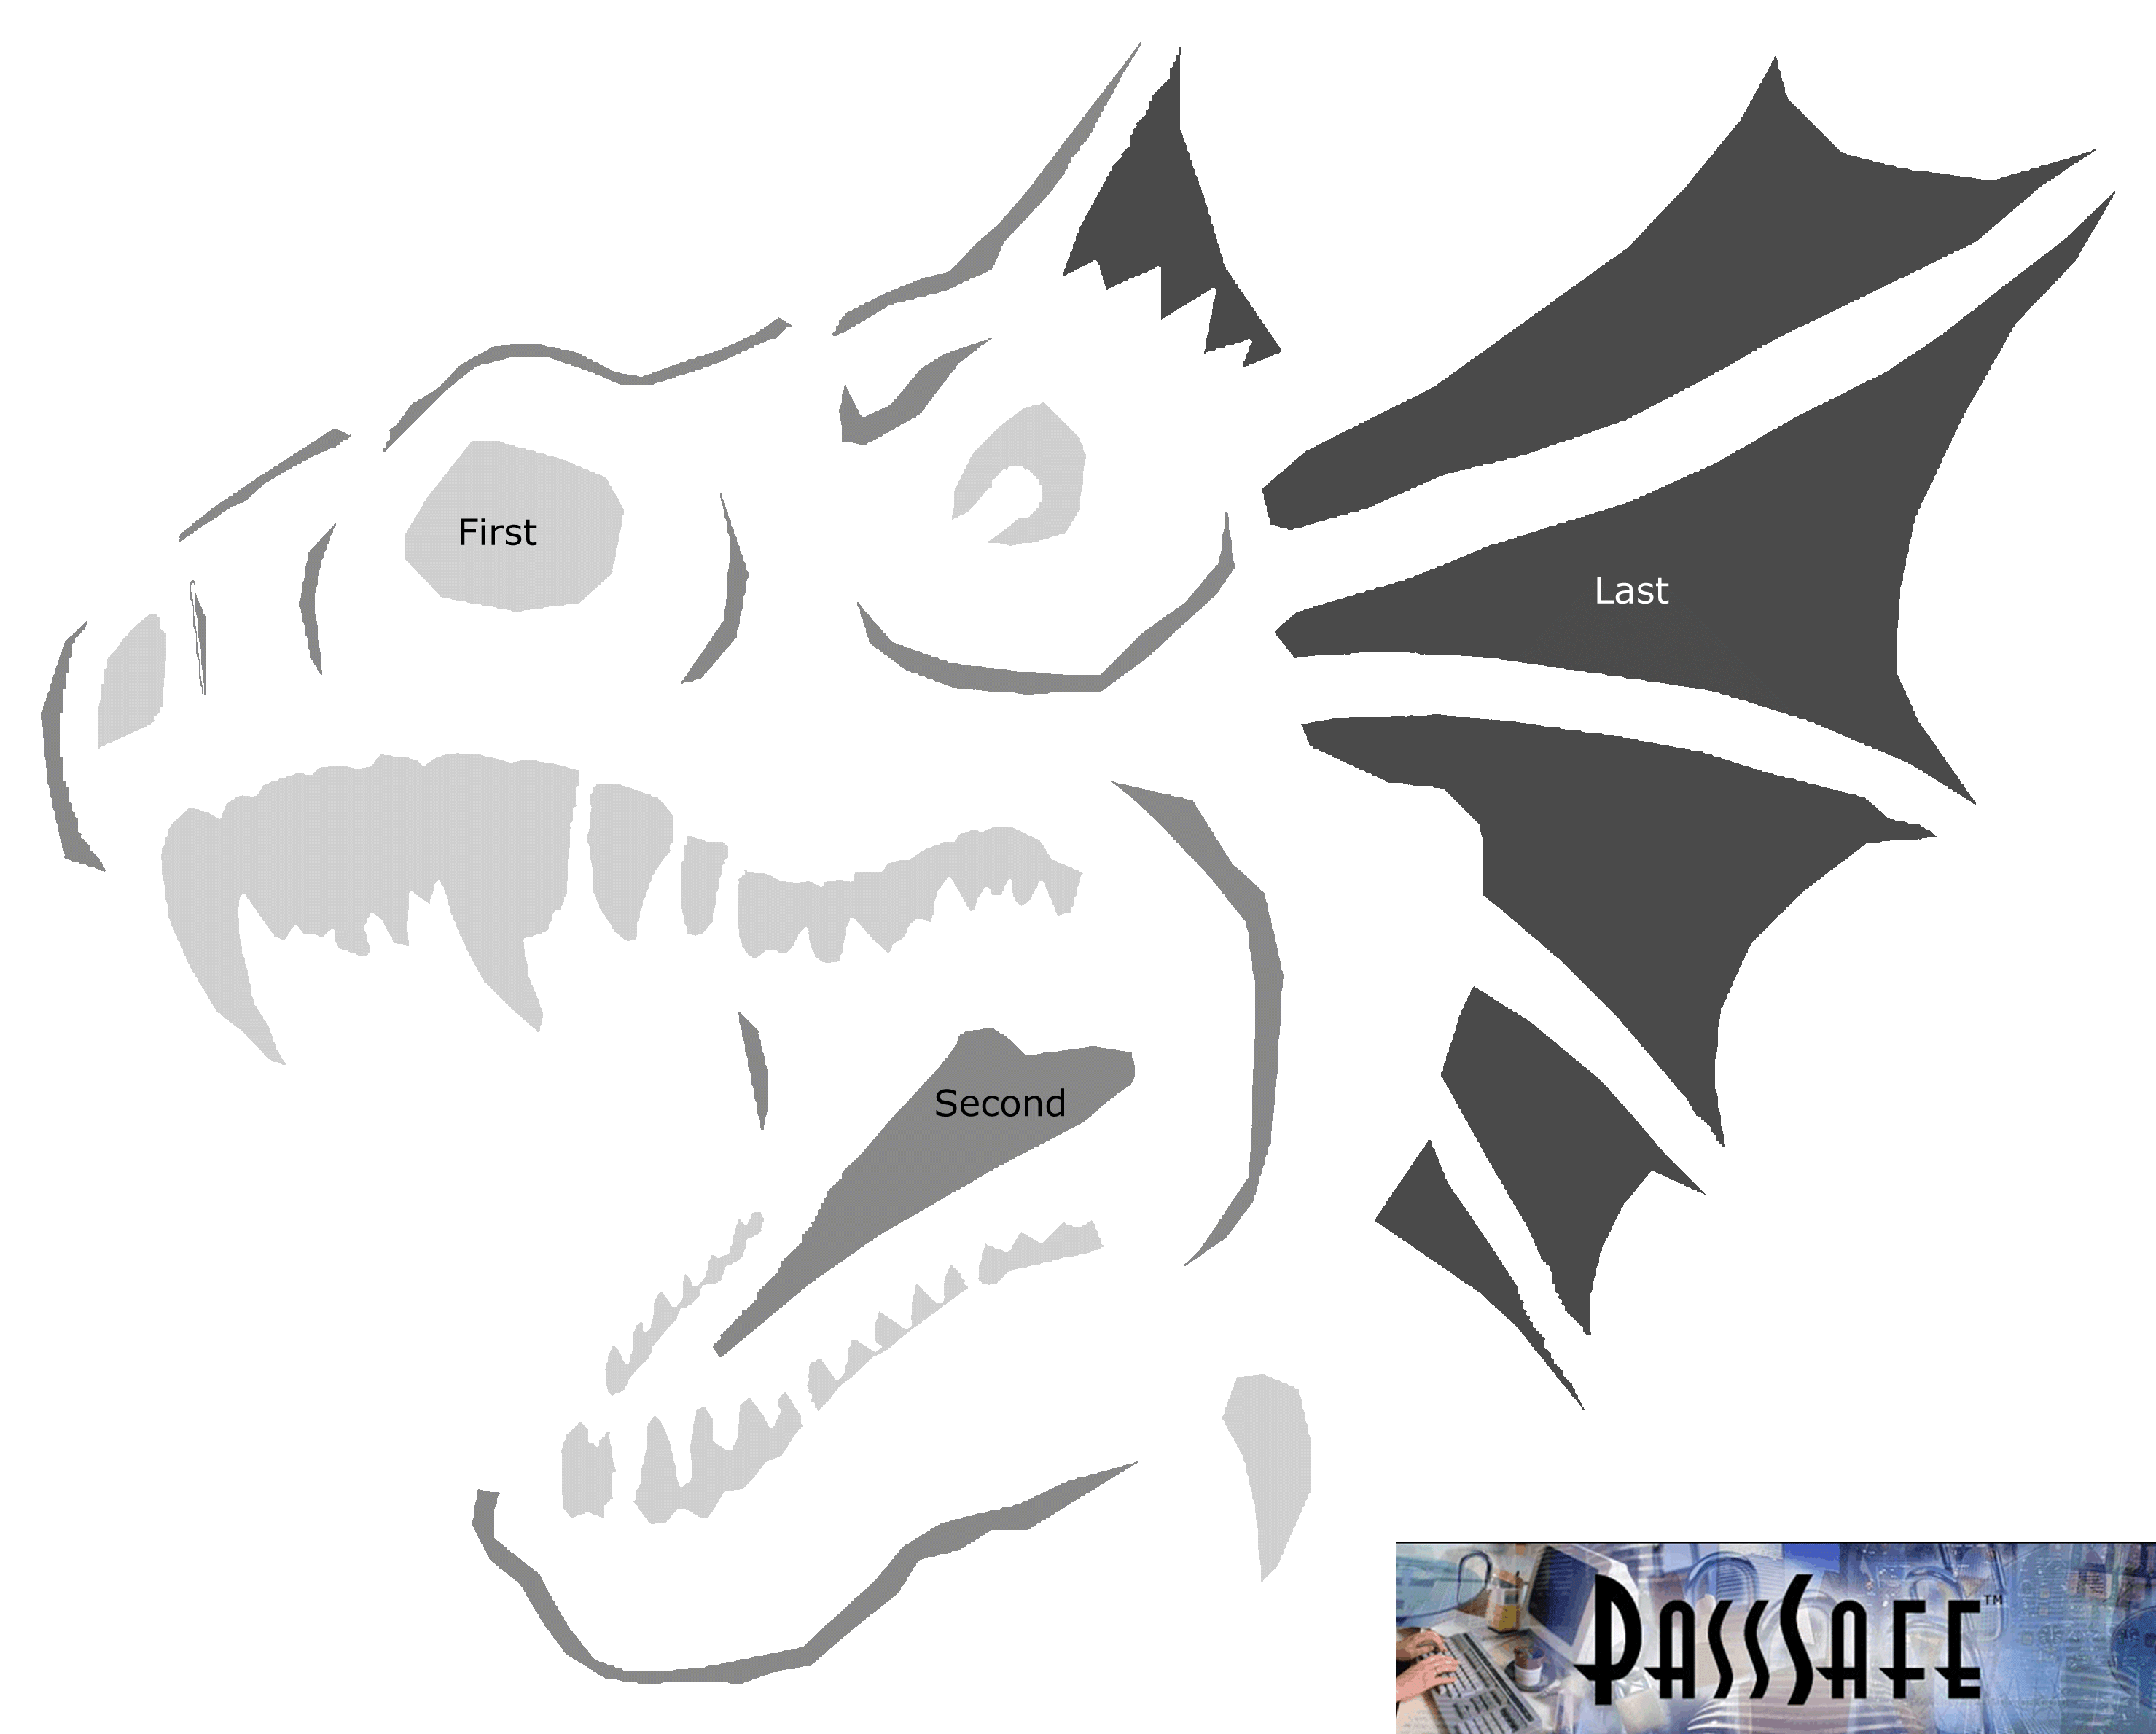
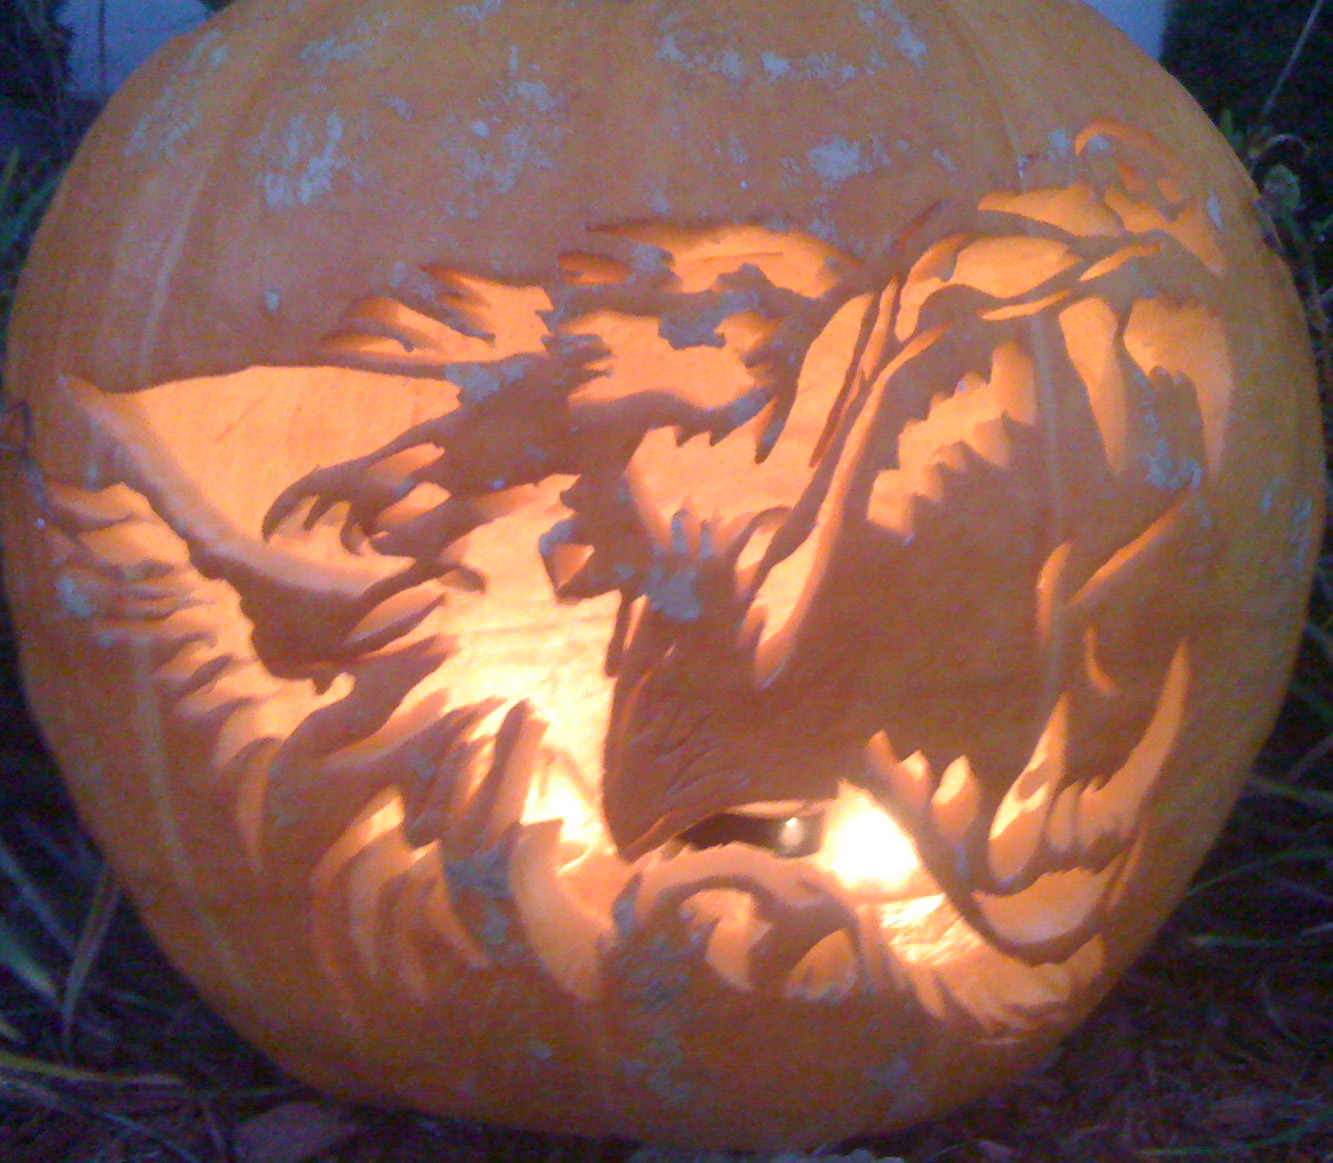
2006 My daughter said "Dad, I want a cool dragon this year" and I hope this fits the bill. This year my wife bought a nice big pumpkin and my daughter wanted to carve it herself, so I tried to make it cool and not too hard. Well, it's still a hard pattern to carve, but the big pumpkin will really help. I also tried to keep in mind that we would be carving on Sunday and Halloween isn't till Tuesday, so it had to be a pattern that would last I couple of days (no tiny details that will quickly wilt). Only time will tell, but I hope this pattern fits all the requirements and creates a really killer pumpkin. Our house has gotten a bit of a reputation for our pumpkins, and I think this one will carry on the tradition very well. |
||
|
2007 In 2007 we re-used the 2006 pattern. This was the second time my daughter did the carving. It was magnificent. We have found a great source for large pumpkins and this really helps the patterns show their full detail while keeping the detail large enough to still carve. It looks like the days of me carving have come to an end. Now I design the patterns and she does the carving. Mom cleans the pumpkins out making every pumpkin a true family adventure... Woot! Go Mom! |
||
In 2010,
Rob H. sent in this photo saying "Thanks for the pattern, we love it.".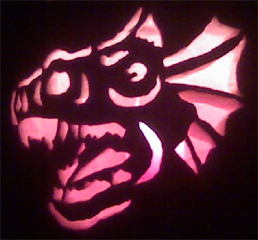 Send us pictures of your pumpkin, using one of our patterns, and we will add it to the site as well. |
||
|
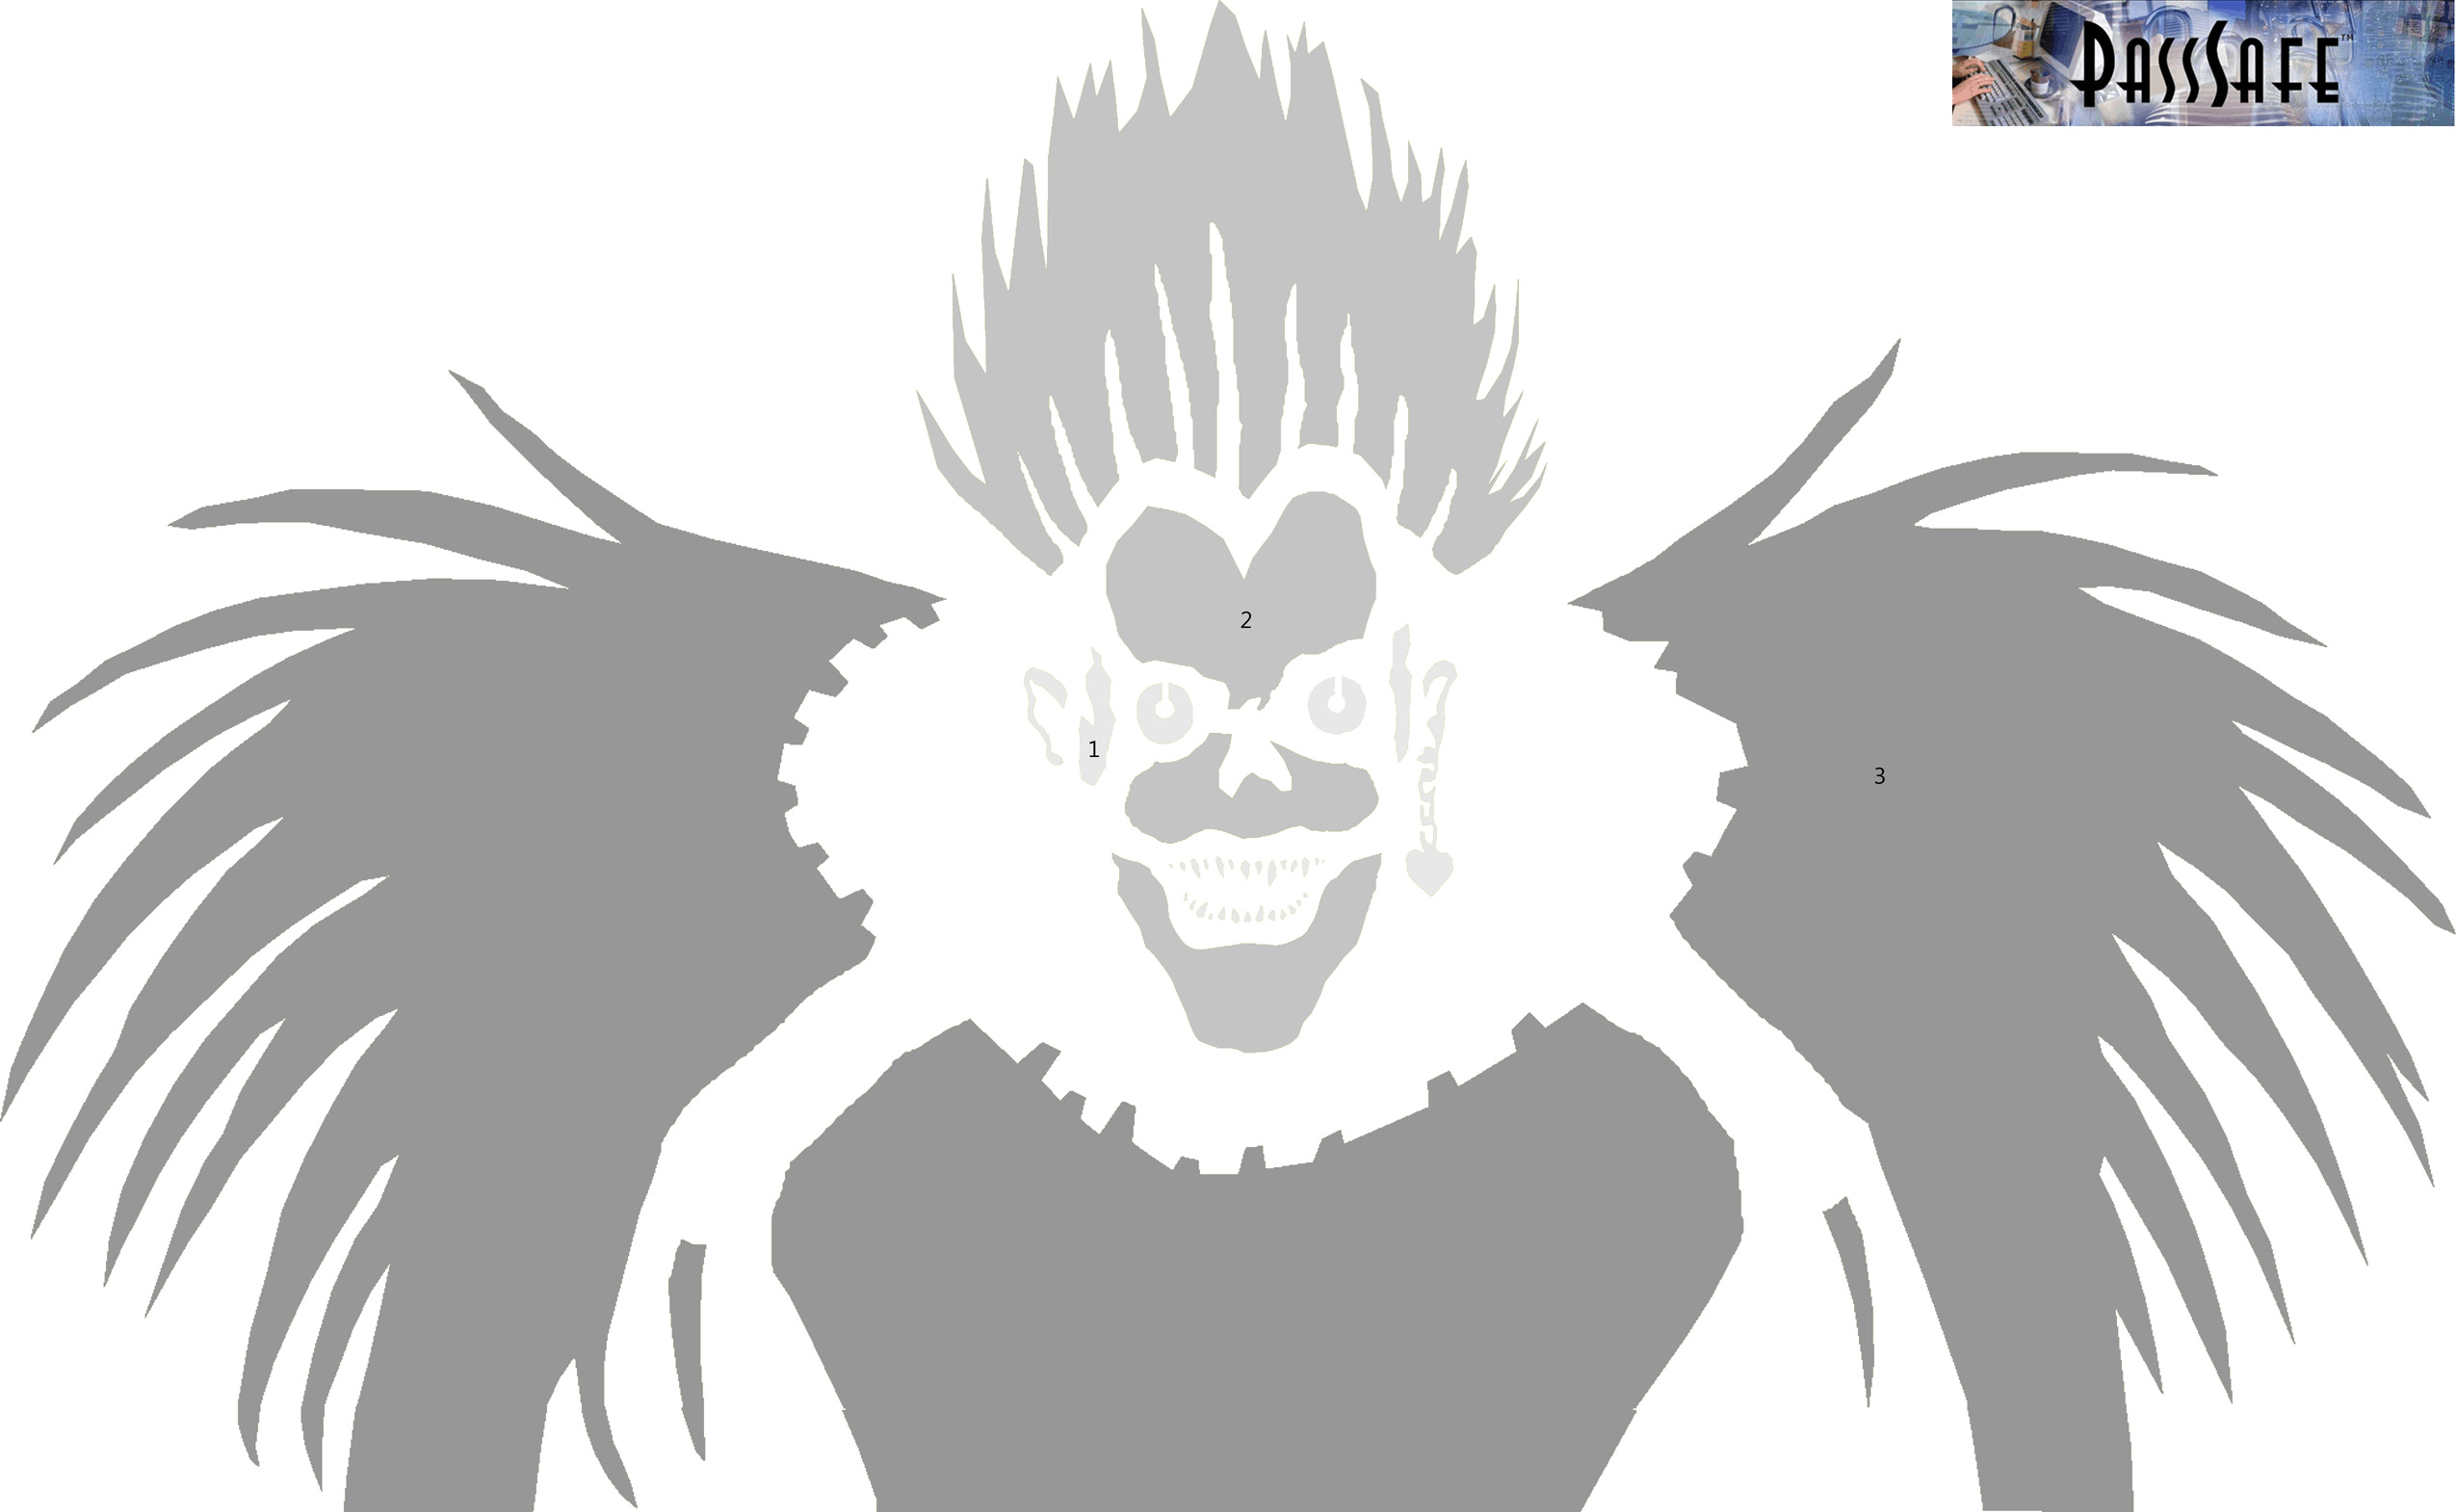
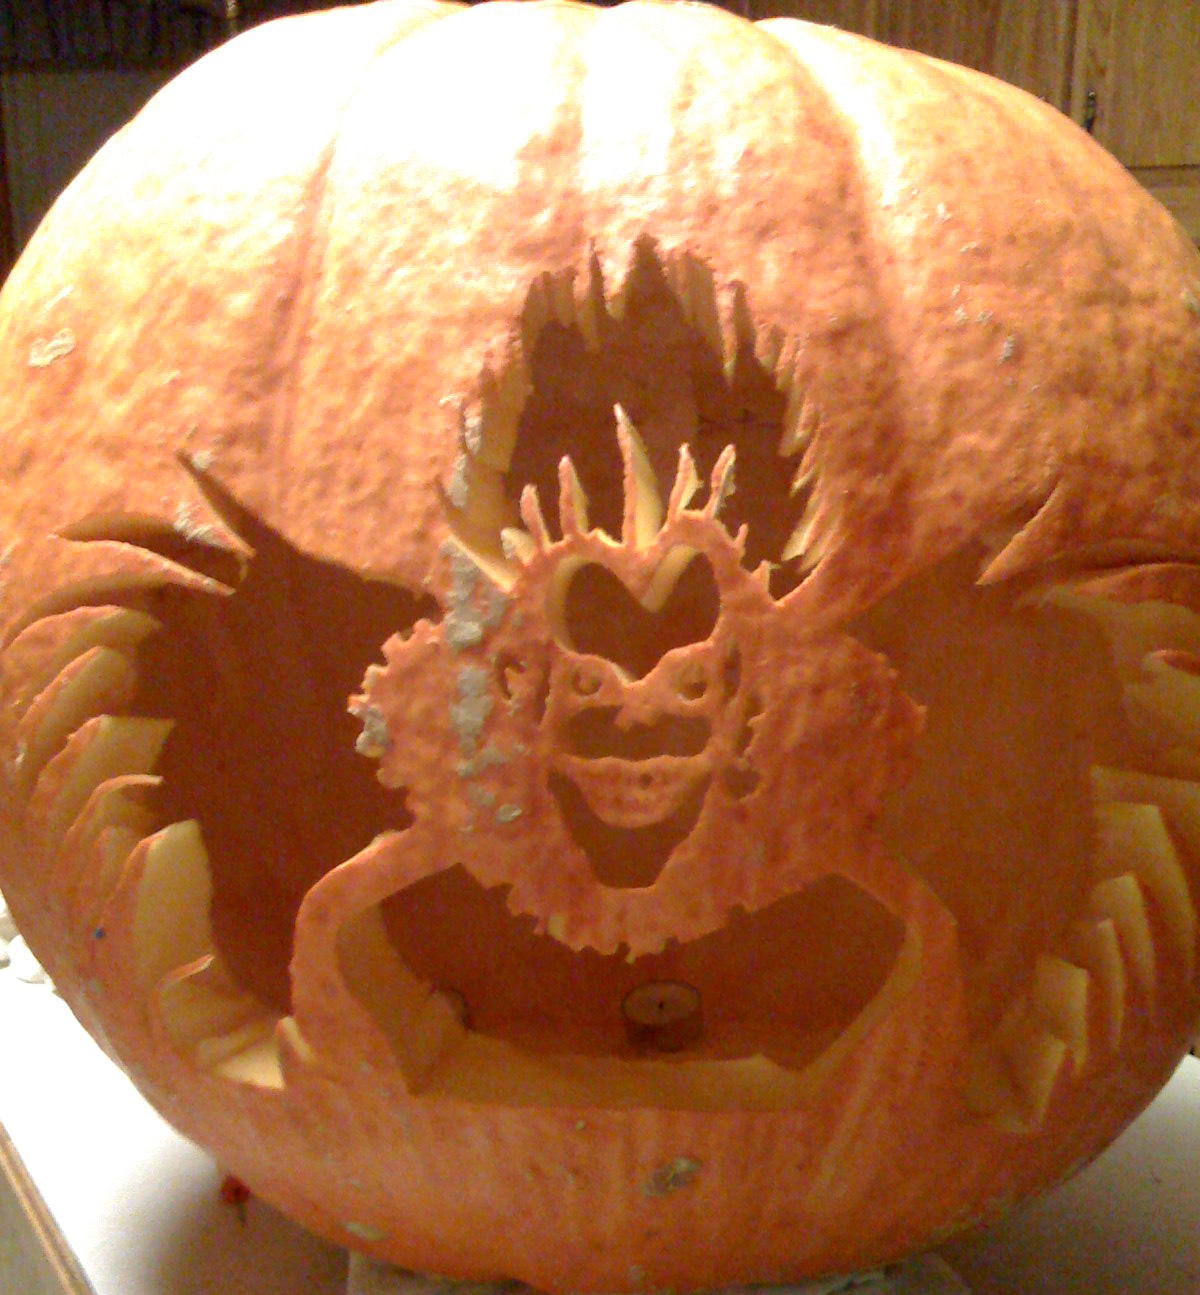
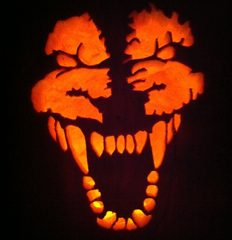
2008 For 2008 my daughters love of anime has matured a bit and she just loves the Death Note series. We were not sure which character to do as most are just humans that look pretty normal. She wanted me to do "L" but he just wasn't "Halloween" enough. We found several pictures of Ryuk and with a blending of several images I had a design that I liked. Then, by hand in Photoshop, like all the others, I created the outline and then engineered the final design. It is harder than most people think to create a pattern. First it has to look like the target character, but even more important, it has to be carve-able and the remaining pumpkin parts all have to connect and have enough support to not break. For instance, you can't have floating eyeballs, they have to attach. The weight of each part has to have enough pumpkin holding it in place to support its weight. This year the pumpkin man outdid himself and got us a HUGE... make that GIGANTIC pumpkin, so part of my design was to have a pattern that could take advantage of all that space. This pattern even wraps around the sides a bit. This is my first pattern to have a lot of width, so we will have to see how well that works out. If you want to use a smaller pumpkin, only do the head and hair and do not carve the body and shoulders. This should work pretty well and most fans will still know it's Ryuk just from the hair, face and the tell tale earring. |
||
| Not bad... | ||
 |
 |
|
|
2009 My daughter is getting older and asked for something a bit more challenging this year. She has been playing World of Warcraft for a few years now and this fall we took a family vacation to California to attend Blizzcon. At Blizzcon they announced two new races for the game. We got to play the beta while we were there and my daughter just fell in love with the Worgen. This patterns seemed perfect for her this year so I cranked out this very cool wolf man style pattern. I think this is my best to date, I hope you agree and try it out yourself. As she does every year, my wife got us a HUGE pumpkin, so I'll print this at almost 16 inches tall and 20 inches wide. I'm really looking forward to seeing this one lit. |
||
|
Oh check this out... it came out great! |
||
 |
 |
|
| Notice we didn't carve the cheek, it just looked like it would be too weak. | ||
|
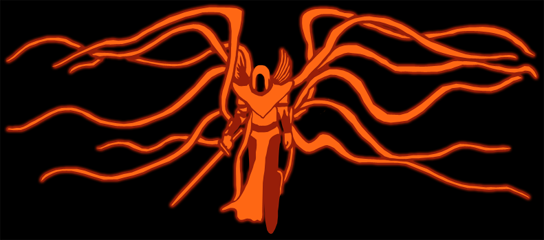
2010 After the Worgen last year, I was a bit intimidated by my own work, what could I do that wouldn't be a step backwards? I created a Tyrael the Archangel from Diablo, it was my first pattern to use scraping and not just cutting and it was pretty intricate. It was cool, but we all agreed that the wings were just too wide and no pumpkin would be large enough to support it.
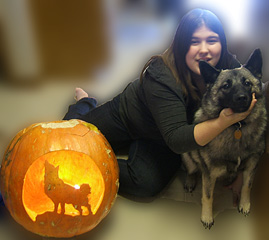
What to do? It was tough to pick this year. Looking around the internet I saw a picture of a wolf howling at the moon. Well, it just so happens that this year we added a dog to our family. His name is Koda and he is a Norwegian Elkhound. See http://www.youtube.com/user/MikeReedKS for all my YouTube videos, including several of Koda. We took a few shots of Koda reaching for a banana in my daughters hand to get him to stand in the right pose, and with the help of Photoshop, *POOF* we had our new pattern. I think this one will be fairly easy to carve and as a family we just love it!!! We hope a few Elkhound lovers will see this an enjoy it as well. |
||
|
You might notice that this year I changed the color of the cutout portions from yellow to orange. I sampled the color from one of the lit pumpkin pictures, so I hope it better represents what the pattern will actually look like once cut out. |
||
 |
 |
|
| We found it difficult to cut out the moon becuase wrapping the pattern on the pumpkin required us to cut and wrap the paper to get it as flat as possible, so we pretty much had to eyeball the moon. It isn't perfectly round, but it came out very nice indeed. We know this is a pretty personal pattern, so it may not get as many downloads as say the dragons do, but hey we love it!!! | ||
|
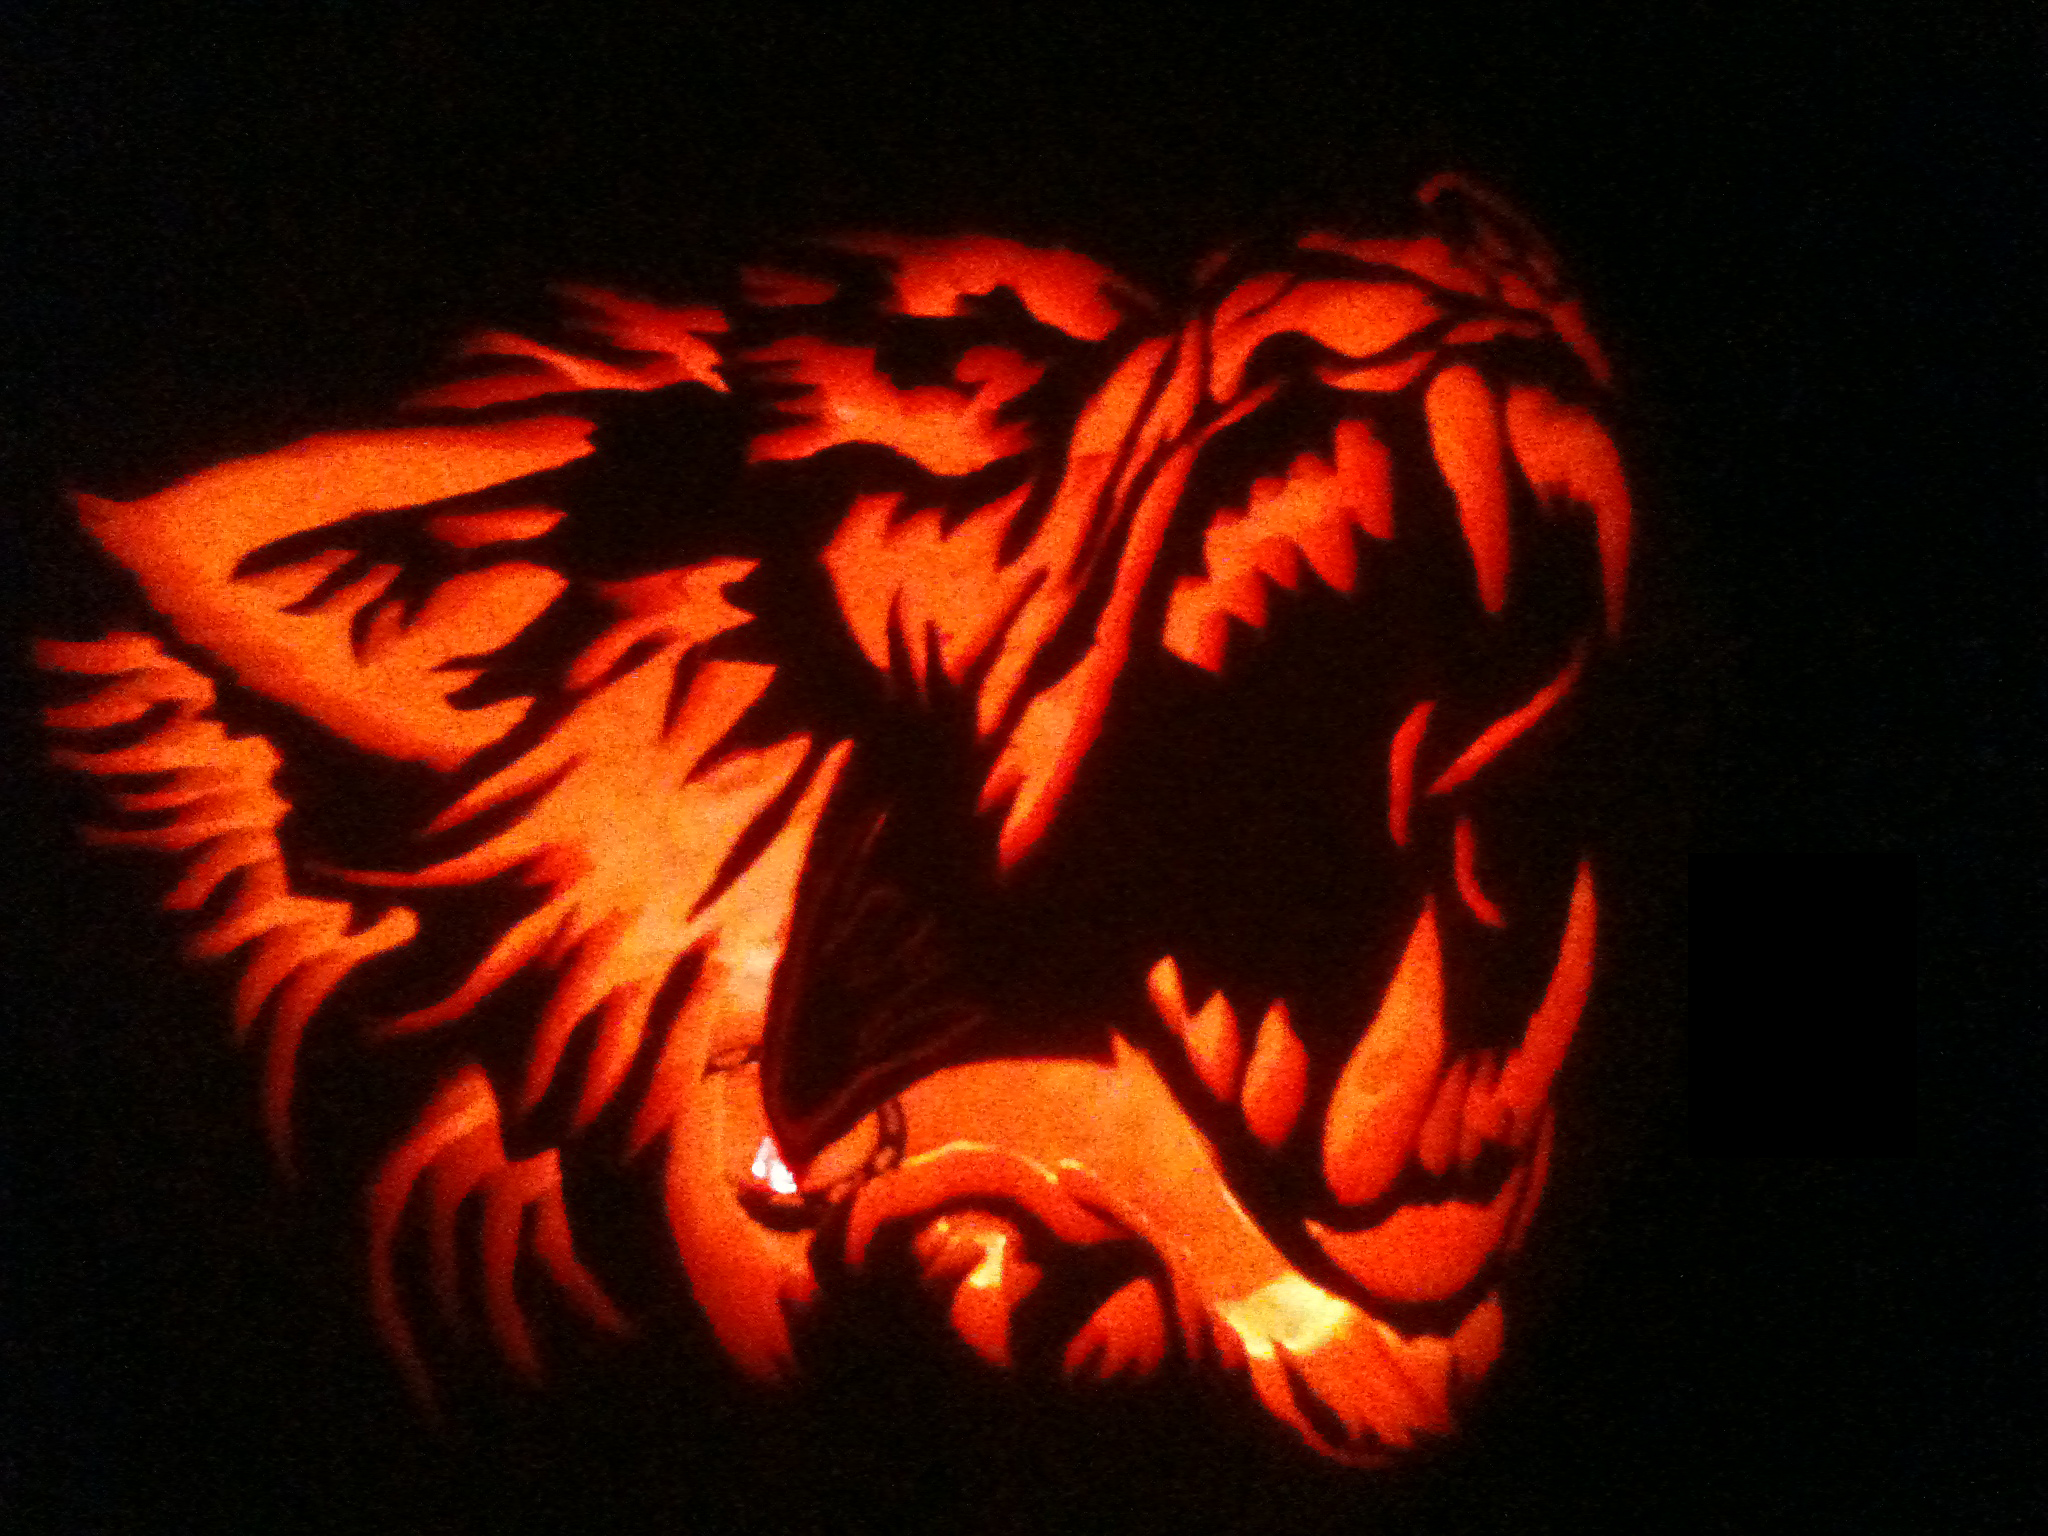
2011 The dragon patterns get the most downloads and the strongest reactions from the kids, so I went to Google Images and typed "Dragon" and looked at a ton of images. There are so many choices, but every one was either going to be too difficult or be just another dragon. Then I ran across one that was a direct, straight on face and while far too detailed for a pumpkin pattern, I had an idea. What if I just took the face, forget all the "dragon" parts and made something a bit different and unique? I focused on "Dragon", "Textured Face", "Scarry Clown", "Creepy" and "Snake". From the original picture and a touch of my own design, I created "Out of Darkneess". I hope you like it.
My wife was late to the Farmers market and someone came and bought five huge pumpkins, including the one the pumpkin man had tagged for us. She still got a large pumpkin, in fact it is so large it made me wonder just how big the one was that got away! |
||
This one came out really nice, plus it has lasted almost a week already and still looks good. It still took skill to carve, but this might be a good first pattern for anyone wanting something special, but not ready for a really hard carve. My daughter wanted me to add a tip for this one... don't push the parts out as you carve, left in they work as support for carving neighboring parts. |
||
Natta Trivimol sent an email saying "we used your "out of the
darkness" we loved it!"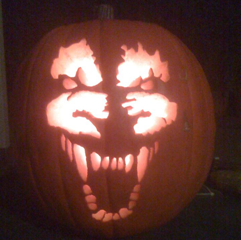 THANKS NATTA!!! So glad you sent us this picture! If you carve one of our patterns, be sure to send us a picture so we can add it to this page! |
||
HAPPY HALLOWEEN!!! |
||
|
Check out our favorite project: Sasha Knows™ |
||